
Gloucester Township Roofing handles chimney flashing repair in Gloucester Township, NJ, serving surrounding cities including Pine Hill, Bellmawr, Woodbury, Haddonfield and Mantua, with more than 20 years spent stopping leaks at the place most older roofs fail first. We reflash brick, block and framed chimneys on shingle, slate and metal roofs, and we do it with new metal rather than another layer of tar.
A chimney passes straight through the roof, and the joint between masonry and shingles moves with every change of season. The only thing keeping water out of that joint is the flashing, a set of metal pieces lapped with the shingles and tucked into the brick. When any piece fails, water runs down the chimney into the attic, the walls beside the chimney or the ceiling below.
Many chimney leaks we see have already been patched several times with roof cement or caulk, often by whoever was on the roof last. Those patches look solid when they are new and crack within a few seasons. We remove them, find what actually failed, and replace it, then show you photos of the finished work.
How Chimney Flashing Works
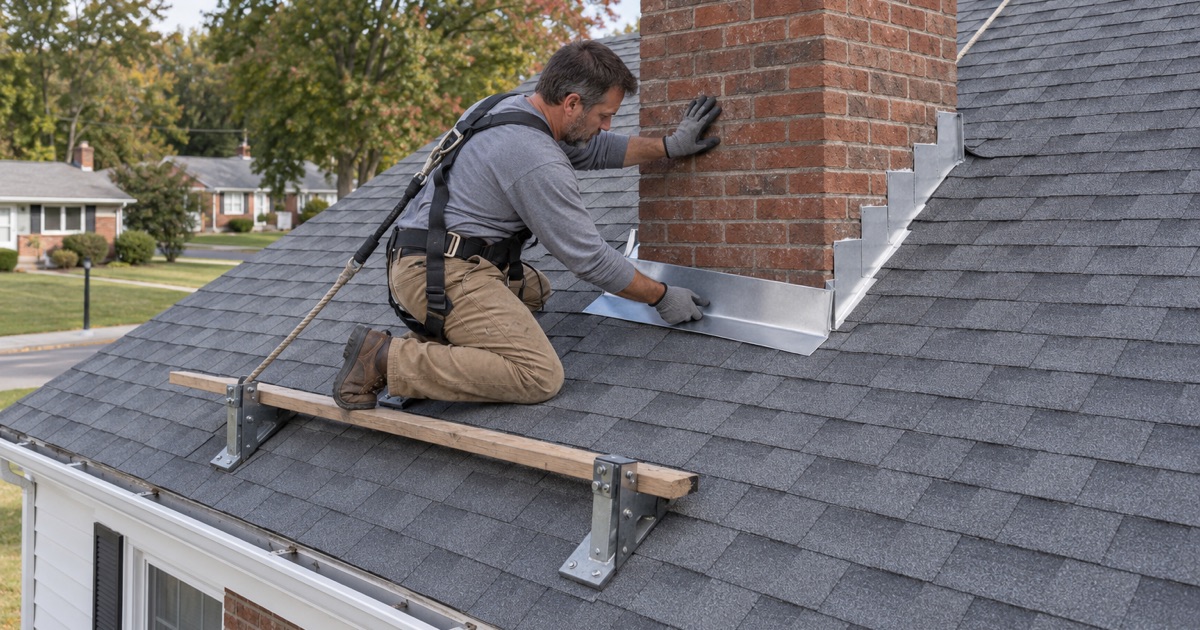
Step Flashing Along the Sides
Along each side of the chimney, individual L-shaped pieces of step flashing are woven in with each course of shingles, one piece per course. Each piece overlaps the one below it, so water running down the side of the chimney is passed from piece to piece and out onto the shingles rather than into the roof.
This is why chimney flashing cannot be done properly without lifting and relaying the shingles around the stack. Continuous strips of metal laid on top of the shingles, or flashing that skips courses, are common shortcuts that leak in the first heavy rain.
Counterflashing and the Reglet
Step flashing alone would leave its top edge open against the brick. Counterflashing covers it, and the correct way to install counterflashing is to cut a groove, called a reglet, into a mortar joint, insert the bent edge of the metal, and seal it in place so the brick sheds water over the top of the step flashing.
Surface-mounted counterflashing that is simply glued or screwed to the face of the brick depends entirely on sealant, which fails. Cutting a proper reglet takes longer and leaves a repair that lasts as long as the brick itself.
Crickets on Wide Chimneys
On the uphill side of a chimney, water running down the roof hits the brick and has nowhere to go. A cricket, or saddle, is a small peaked roof built behind the chimney that splits the water and directs it around both sides.
Wide chimneys without a cricket collect water, leaves and ice against their back face, and that is often where the worst leaks start. We build crickets from framing and sheathing, cover them with ice and water barrier and metal, and tie them into the surrounding roof.
The Front Apron
On the downhill face of the chimney, a single apron piece of flashing laps over the shingles below and runs up the brick under the counterflashing. It is the simplest piece of the system, and it still needs to wrap correctly around the front corners so water from the step flashing exits cleanly onto the shingles.
Signs of Chimney Flashing Failure
Stains Beside the Chimney
Water stains on the ceiling or walls next to the chimney, wet framing around the chase in the attic, or peeling paint near the fireplace are the classic signs of failed flashing. They usually get worse in wind-driven rain coming from the side the leak is on.
In the attic, we look at the framing around the chimney for dark stains and soft wood, which tell us how long the leak has been going on and how much decking will need replacing.
Tar, Caulk and Patched Metal
Thick layers of roof cement or caulk around a chimney are a sign it has leaked before and was patched rather than repaired. Rusted step flashing, counterflashing pulling out of the mortar, and gaps at the corners are also clear warnings.
We photograph the condition of the existing flashing from the roof so you can see what failed and why we recommend replacing it, rather than taking our word for it from the ground.
When the Masonry Is the Problem
Not every chimney leak is a flashing failure. Cracked brick, eroded mortar joints, a broken crown on top of the chimney or a missing cap can all let water in above the roof line, where no flashing can stop it.
We check the chimney above the roof during every flashing repair and tell you if masonry work is needed. When it is, the repointing or crown repair should be done before or alongside the new flashing, so the counterflashing is set into sound mortar.
Chimney Flashing Repair Options
Reflashing a Chimney on an Existing Roof
On a roof with useful life left, we remove the shingles around the chimney, strip the old flashing and any tar, and replace damaged decking. We install ice and water barrier around the base, new step flashing woven into the shingles, a new apron and back pan or cricket, and counterflashing set into a fresh reglet.
The shingles we lift are reused where they come up cleanly, and replaced with matching ones where they do not. The result blends into the roof without the patchwork look of layered tar.
Chimney Flashing During a Roof Replacement
Every roof replacement we do includes new chimney flashing. With the old roof off, the chimney base is fully exposed, so it is the easiest and least expensive time to build a cricket, replace rotted framing and install new metal throughout.
Reusing old flashing under a new roof saves a little on the day and costs far more when the new roof leaks around the chimney a few years later.
Copper and Long-Life Metals on Slate Roofs
Older slate roofs were usually flashed with copper or lead, because the slate outlasts ordinary sheet metal by decades. When we reflash a chimney on a slate roof, we use metal suited to the life of the slate, so the flashing does not become the weak point.
On shingle roofs, we use corrosion-resistant metals appropriate to the roofing and the masonry, and we make sure dissimilar metals do not touch where they could corrode each other.
- 20+ Years in Business
- Line-Item Written Estimates
- NJ and PA Contracts